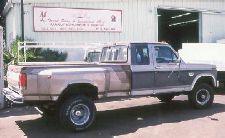
1985 4x4 F250 Pickup Truck
STEP 1 - FIND A VEHICLE
My search narrowed to finding a 4x4 F250 or F350, extended cab, diesel, automatic with a turbo and dual wheels, if possible. All the turbo and dual wheels trucks on an extended cab chassis were either already sold or too much money. Eventually I found an F250, 6.9 diesel, C-6 automatic, single wheels, but 4WD. The cost was $4,400 for a 1985 F250 with 188,000 miles. The good new was that the two owners kept good records of their regular service. This truck was found by checking www.recycler.com every week.
Comments: The 6.9 diesel was a proven International Diesel and if it is well cared for, can last 400,000 miles, so they tell me. I now have 218,000 miles and it still runs great. The C-6 automatic (no overdrive) is a strong transmission and should last as long as the engine. The only disadvantage is that the vehicle is under-powered for any type of a load. So I intend to do a motor swap to either a Dodge turbo diesel or the new Ford Power Stroke motor. This will make a separate story of its own.
Comments: The 6.9 diesel was a proven International Diesel and if it is well cared for, can last 400,000 miles, so they tell me. I now have 218,000 miles and it still runs great. The C-6 automatic (no overdrive) is a strong transmission and should last as long as the engine. The only disadvantage is that the vehicle is under-powered for any type of a load. So I intend to do a motor swap to either a Dodge turbo diesel or the new Ford Power Stroke motor. This will make a separate story of its own.
STEP 2 - UPGRADE SUSPENSION
|
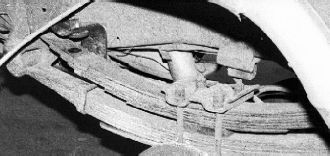
Installed a suspension upgrade kit and overloads from National Spring in El Cajon, CA (619) 441-1901. The rear suspension kit contained two extra leaves for the original rear spring pack while the front pack only needed one extra tapered leaf. This raised the vehicle 2" with very little effect on the ride. Overload springs were added on the rear to handle the camper when it was loaded. I selected overloads rather than air bags because the vehicle will also be used for four wheeling. Once the suspension was installed, I ordered the heavy duty Black Diamond Shocks. |
STEP 3 - BUILD WHEELS & SELECT TIRES
|
In order to obtain a larger dually wheel I contacted B&W Wheel in Fontana, CA (909) 356-8094. They built a set of dually wheels 8" wide instead of the standard 6". This allowed me to use a larger tire. For the tire, I selected a 265/75R16 Goodyear AT/S. This tire has 10.5" of tread width and is 31.8" tall. I wanted to keep the height low for those times when the camper is loaded. The AT/S tire is aggressive for off road use, but still provides reasonable mileage without any highway noise.
|
STEP 4 - FIND WHEEL ADAPTER
|
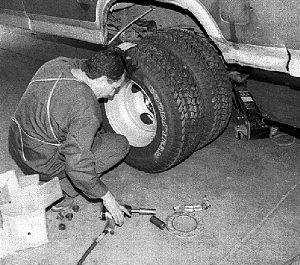
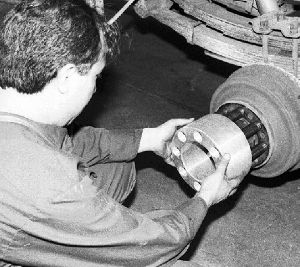
I utilizesda unique design for my wheel adapters. I found a company (now is out of business) who used a machined shank that screwed onto the existing wheel studs. The aluminum spacer slid over the shanks leaving a new set of studs exposed. This method seemedstronger than others I had seen and checking your lug nuts occasionally is all that was necessary to insure that myadapter and wheel was safely secured. Originally I was going to use the adapters only on the front. I intended to change the complete rear axle to a dually axle. However, after a little investigation, I determined the custom 8" wide wheels would not fit over the larger brakes that accompany the dually axle. So I used a custom wheel adapters on both axles.
|
STEP 5 - INSTALL A DUALLY TRUCK BED
|
M&L Truck Body & Equipment Corp. (714) 639-9011 in Orange, CA installed the dually pickup bed. I decided to completely replace the bed because it was not worth investing in the bolt-on dually fenders. Dually pick-up beds can be found for $100-600 or you can give up searching and buy one from a wrecking yard for $800-1000. The one I bought for $100 had some fender damage and the tailgate was in fair shape. But the fiberglass fenders can easily be fixed and I can used the original tailgate.
|
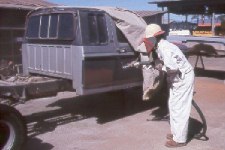
STEP 6 - PAINTING
|
The Truck was disassembled at DEVCO in Redlands CA, blasted with "walnut" shells, painted and reassembled. The final touch was custom graphics.
|
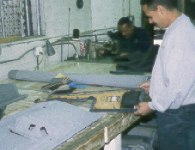
STEP 7 - INTERIOR
|
D&R Custom Interiors in completely rebuilt the interior of the truck. They replaced the headliner, carpets, rebuilt the seats and covered the door panels.
|
STEP 8 - ENGINE UPGRADES

|
I found a used Banks Turbo and nobody is better equipped to install it than Banks Engineering in Irwindale, CA. So I had them to install it along with their trick exhaust system. The engine does have a few miles on it and when I find the right deal on a used Ford Power Stroke, we'll be doing an engine swap and writing about it.
|
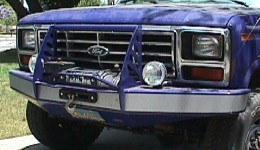
STEP 9 - BUMPER
|
Hansen's Enterprises in Salinas, CA custom built the front bumper. It's awesome. A slightly used Warn 10,000 winch and a set of IPF lights gives the truck both driving and fog lights in one case.
Hansen Enterprises -- (831) 757-9779 Warn Industries -- www.warn.com IPF lights -- ARB (888) 427-2872 |
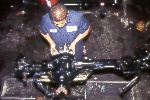
STEP 10 - AXLES & DIFFERENTIALS
|
The next step is replacing the IFS front axle with a Dana 60. I secured a Dana 60 and plenty of good advice from Foothills 4x4. Of course, for the serious 4-wheeling I had Hicks 4x4 in Pomona install Detroit Lockers in both differentials
|